Overview
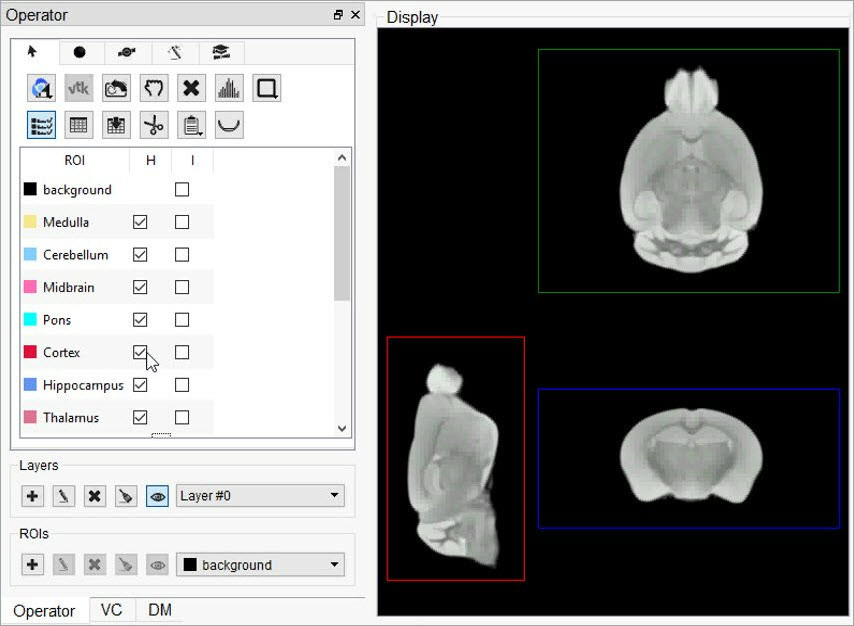
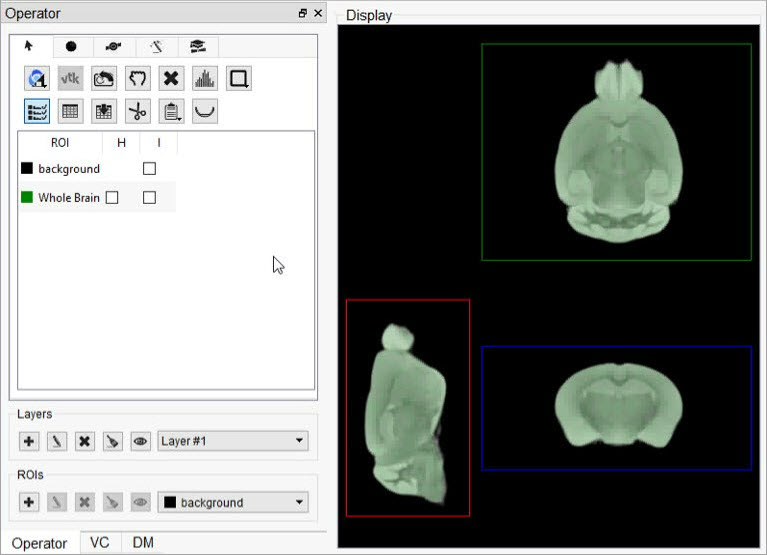
ROI stands for Region of Interest and is used to describe a particular area or volume within an image for which the user wishes to characterize some quantity or quality. The 3D ROI operator provides advanced tools for drawing, visualizing, saving, and quantifying both 2- and 3-dimensional regions. This tool allows for having a voxel belonging to more than one ROI. For example, a user could have an ROI that contains the whole brain and other ROIs for regions of the brain, meaning that each voxel of the whole brain ROI would need to simultaneously be part of two different ROIs.
Invicro implemented overlapping of ROIs by adding layers. The user is able to add new layers in the 3D ROI Operator, select an active layer, and create and modify ROIs in that layer independent of the contents of other layers. Overlapping is then possible as each voxel can belong to various ROIs on each layer.
The previous ROIs approach limited the user to 256 ROIs, as it used an internal buffer of unsigned chars (1 byte per voxel). To allow for multiple layers, the new approach keeps a list of buffers of unsigned chars that can be increased on demand by the user up to a potential of 8 layers if the RAM allows it. The new maximum total number of ROIs was then increased to 2048, and each voxel now supports up to 8 overlapping ROIs. However, the allocated RAM for the ROIs object increases significantly as the user adds more layers. We can also expect a small overhead execution cost when drawing the ROIs on the image for display purposes, as the blending or the handling of the different layer will require more processing.
Getting There
The 3D ROI tool can be accessed via the operators pull-down menu on the VivoQuant front panel.
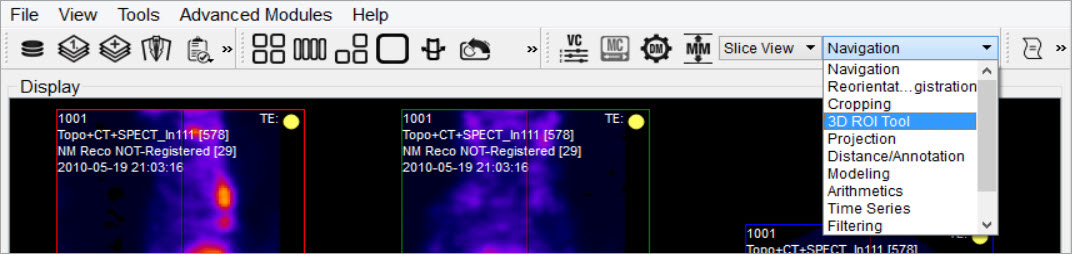
When the 3D ROI Tool is selected, a 3D ROI Tool operator window is displayed.
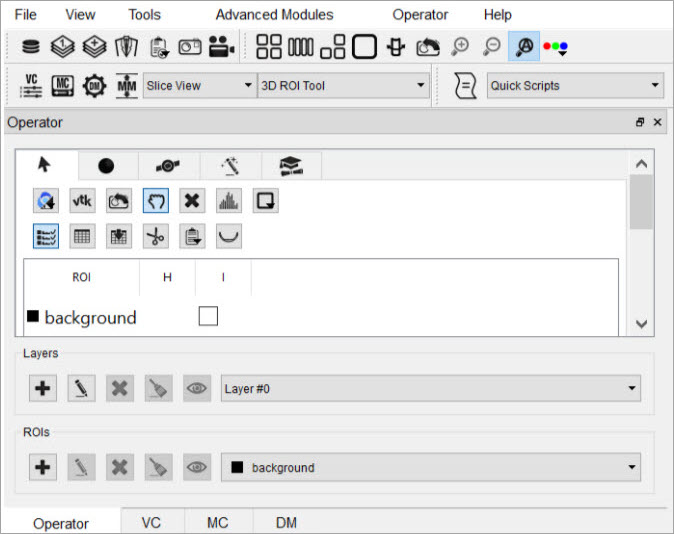
Each tab of the 3D ROI Operator window provides a grouped set of functionalities.
| Tab | Description |
|---|---|
| ROI Loading, Saving, and Quantification Tools | |
| Painting Tools | |
| 2D Drawing Tools | |
| 3D Segmentation Tools | |
| Expert Settings |
Layers
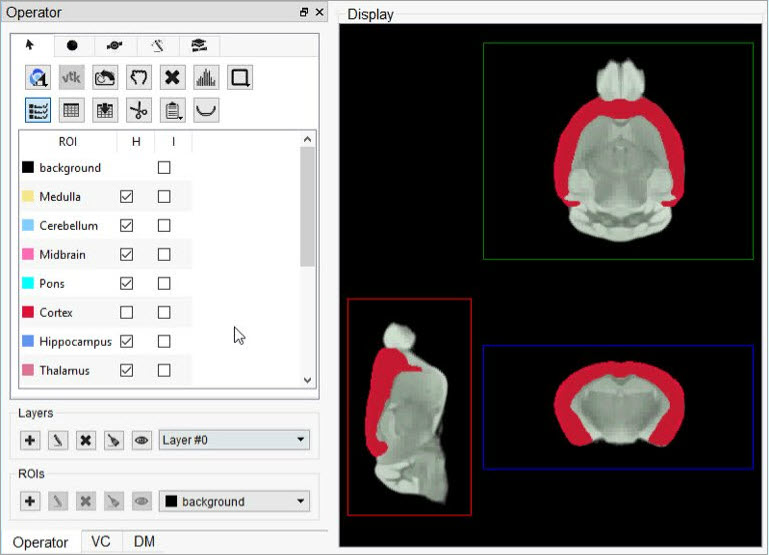
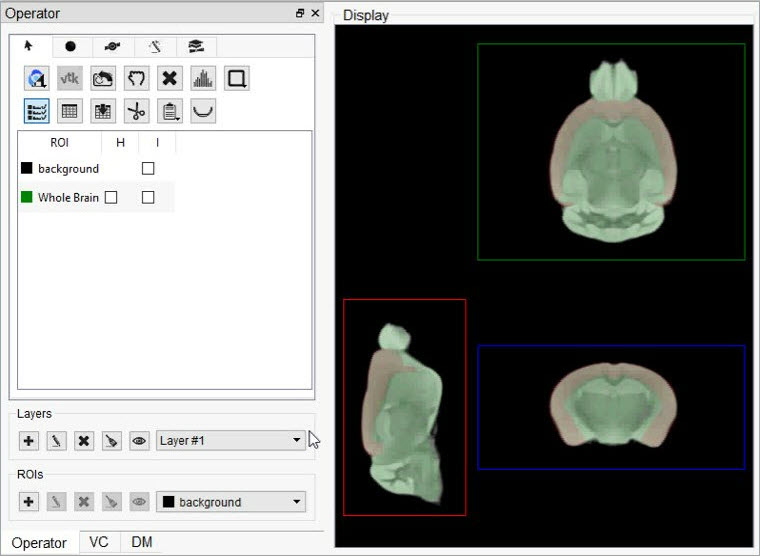
We use ROIs to label voxels in the image as belonging to a region, so we can extract quantitative information about that region from the image. Layers allow the user to specify that a particular voxel belongs to multiple regions. Within a layer, a given voxel can only belong to one region; that is, ROIs are associated with a layer. For example, one layer could contain different brain sections, while another layer defines the entire brain.
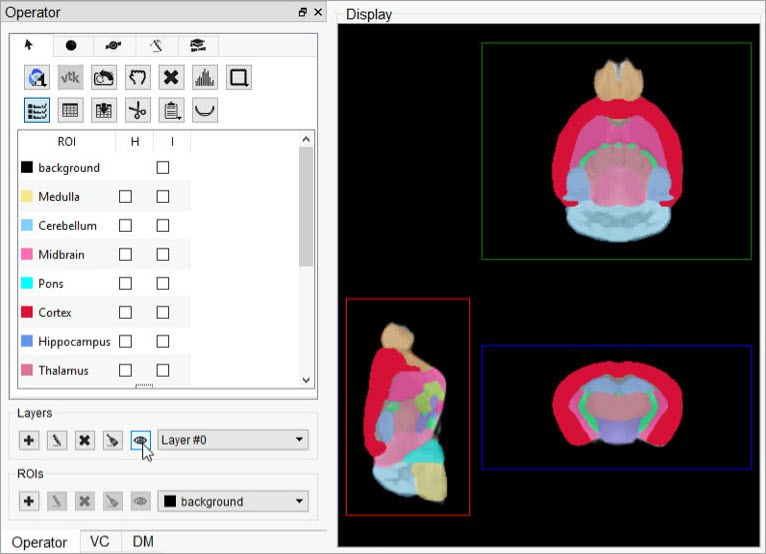
Layers can be created and deleted from the strip of icons at the bottom of the 3D ROI Operator.

Relevant layer actions are described in the table below.
| Icon | Description |
|---|---|
| Add a Layer | |
| Edit a Layer | |
| Hide a Layer | |
| Reset a Layer | |
| Delete a Layer |
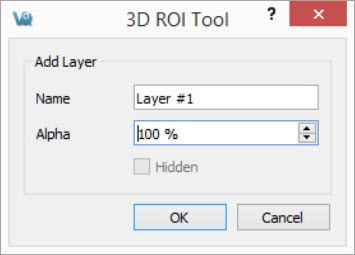
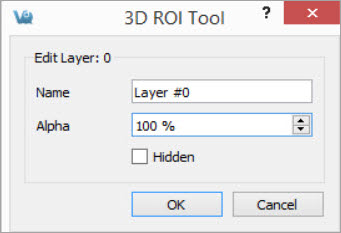
Add a Layer
Click the Add Layer button ![]() to create a new layer.
to create a new layer.
A popup window will open, prompting the user to name the new layer and set the transparency of the ROIs by selecting an alpha value.
- Decrease the alpha value to increase the transparency of all ROIs in the layer.
- Values range from 0% - 100% and change by 10% increments.
- The option to make the layer hidden is not available during the layer creation process and appears greyed-out.
Edit a Layer
Click the Edit Layer button ![]() to edit a existing layer.
to edit a existing layer.
A popup window will open, allowing the user to edit the name of the selected layer, change the transparency of the ROIs by adjusting the alpha value, or hide/unhide the layer.
- Decrease the alpha value to increase the transparency of all ROIs in the layer.
- Values range from 0% - 100% and change by 10% increments.
Select Active Layer
Select the layer of interest from the dropdown Layer to set it as the Active Layer. The display will show the active layer, and any layer actions, such as editing or deleting, will be performed on the current active layer.

Hide a Layer
Click the Hide Layer button ![]() to hide the active layer. Click the Hide Layer button again to show the layer.
to hide the active layer. Click the Hide Layer button again to show the layer.

Reset a Layer
Click the Reset Layer button ![]() to clear the contents of all ROIs in the active layer.
to clear the contents of all ROIs in the active layer.

Delete a Layer
Click the Delete Layer ![]() button to open options for the active layer.
button to open options for the active layer.

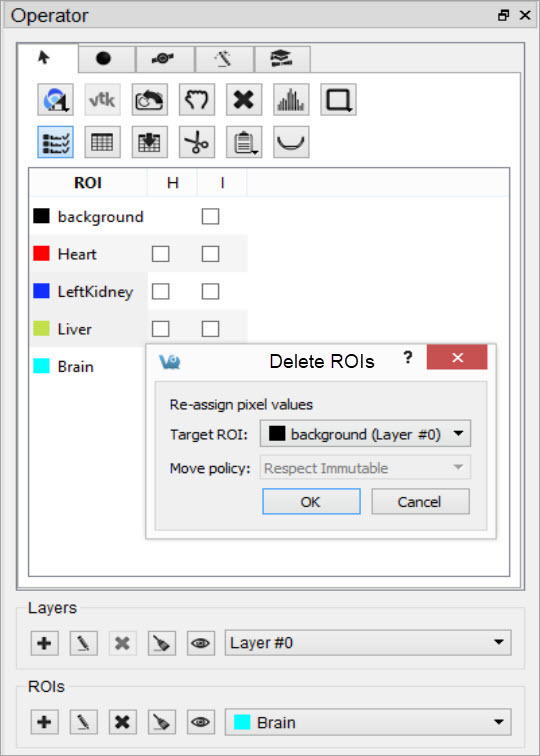
A popup window will open, prompting the user to delete or reassign the ROIs associated with the specified layer.
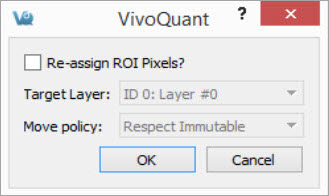
- To delete all ROIs in the layer, click OK.
- To reassign the ROIs to another layer, click the Re-assign ROI Pixels check box and the greyed-out options underneath will become active.
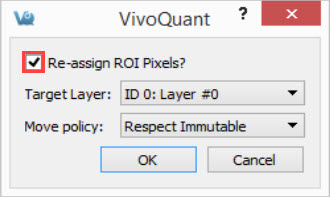
Verify that the layer selected in Target Layer is the layer of interest then select the Move Policy to apply.
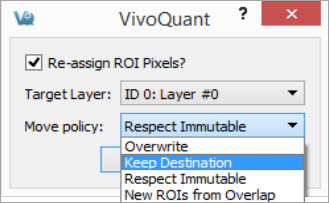
Available Move Policies are described in the table below.
| Move Policy | Description |
|---|---|
| Overwrite | ROIs from the layer being deleted (active layer) will trump any overlapping ROIs existing on the destination layer. Use this option if you do not want any of the ROIs being moved to be changed. |
| Keep Destination | ROIs on the destination layer will trump any overlapping ROIs existing on the layer being deleted (active layer). Use this option if you do not want the ROIs in the destination layer to be changed. |
| Respect Immutable (default) | Use this option if the user wants ROIs from both the destination layer and layer being deleted (active layer) to be preserved or overwritten based on pre-specified information. ROIs marked immutable from the destination layer will trump any overlapping ROIs. ROIs not marked immutable from the destination layer will be trumped by the ROIs from the source layer if overlapping. |
| New ROIs from Overlap | Using this option will create new ROIs in areas where the destination ROIs and the ROIs being moved overlap. Use this option if you want the flexibility to decide how the overlap is handled. |
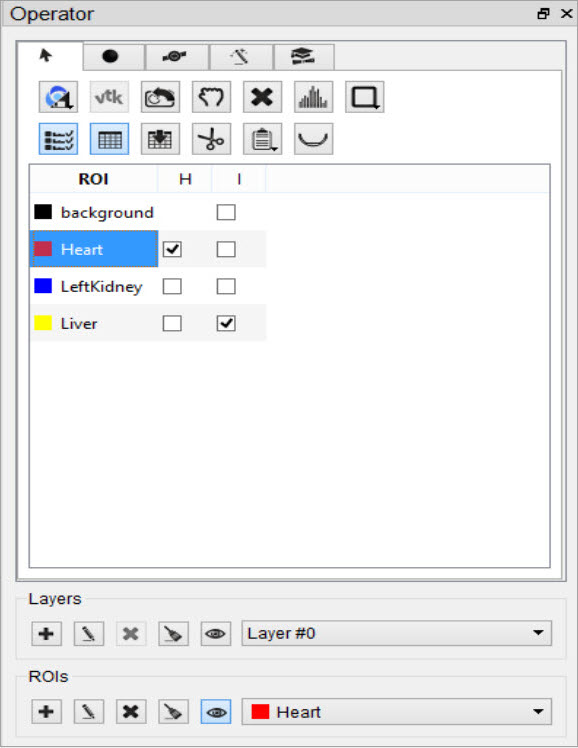
ROI Creation and Deletion
ROIs can be created and deleted from the strip of icons at the bottom of the 3D ROI Operator.

| Icon | Description |
|---|---|
| Add an ROI | |
| Edit an ROI | |
| Delete an ROI | |
| Reset an ROI | |
| Hide an ROI |
Add an ROI
There are two methods for adding an ROI:
1. Add Via ROI Section Buttons
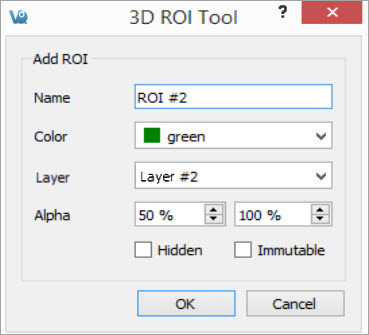
Click the Add ROI button ![]() to open options for adding a new ROI.
to open options for adding a new ROI.

A popup window will open, prompting the user to provide specific information for the new ROI, including:
- The ROI’s name and color.
- The layer to which the ROI should be added
Note: The Number of ROIs per layer should not exceed the limit of 256.
- The transparency of the ROI in the slice and MIP views.
- To alter the transparency, increase or decrease the alpha values (a lower percentage will increase the transparency of an ROI).
- The ROI’s visibility by checking “Hidden” to turn the ROI off in all views.
- The ROI’s ability to be edited by selecting “Immutable.”
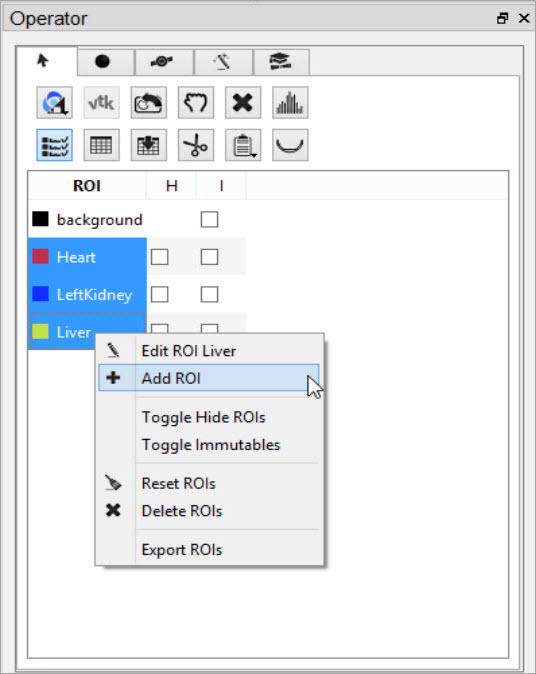
2. Add Via Right-Clicking the Navigation Pane
Another option is to select any (or many) of the existing ROIs is to right click and select Add ROI. This will append a new ROI to the end of the list.
Edit an ROI
To edit an ROI, double-click the ROI to be edited to select it and click on the Edit ROI button ![]() . A popup window will opens and allow the user to change the name, color, transparency (Alpha), visibility, and state of immutability of the ROI. To make ROIs immutable, check the boxes in the ‘I’ column.
. A popup window will opens and allow the user to change the name, color, transparency (Alpha), visibility, and state of immutability of the ROI. To make ROIs immutable, check the boxes in the ‘I’ column.
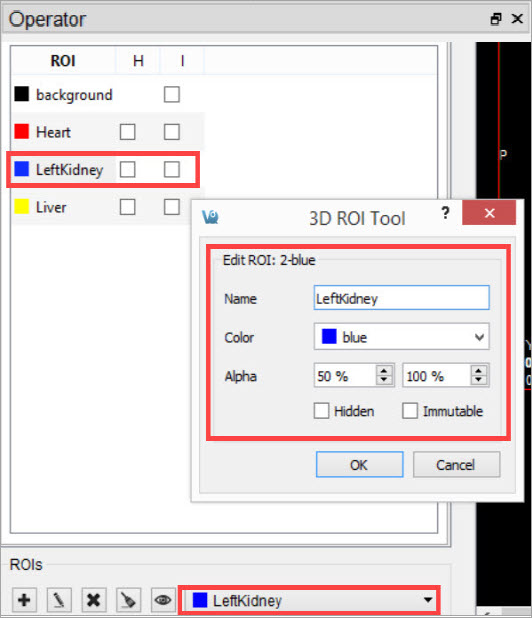
Another option is to right-click on any ROI in the operator and select Edit ROI.

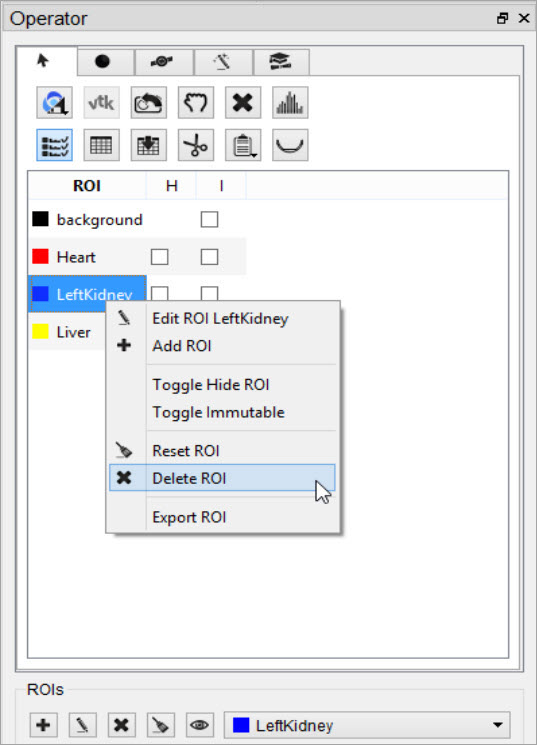
Delete an ROI
To delete an ROI, double-click the ROI to be deleted to select it and click on the Delete ROI button ![]() . A popup window will open and allow the user to move the pixels of the selected ROI to either the background or another ROI.
. A popup window will open and allow the user to move the pixels of the selected ROI to either the background or another ROI.

Another option is to select one or many of the existing ROIs, right click, and select Delete ROI.
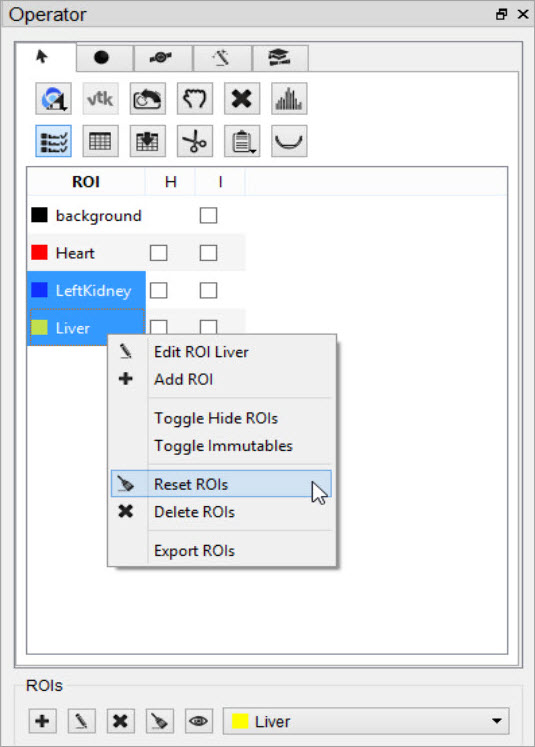
Reset an ROI
To reset an ROI, double-click the ROI to be reset to select it and click on the Reset ROI button ![]() . A popup window will open and allow the user to move the pixels of the selected ROI to either the background or another ROI.
. A popup window will open and allow the user to move the pixels of the selected ROI to either the background or another ROI.
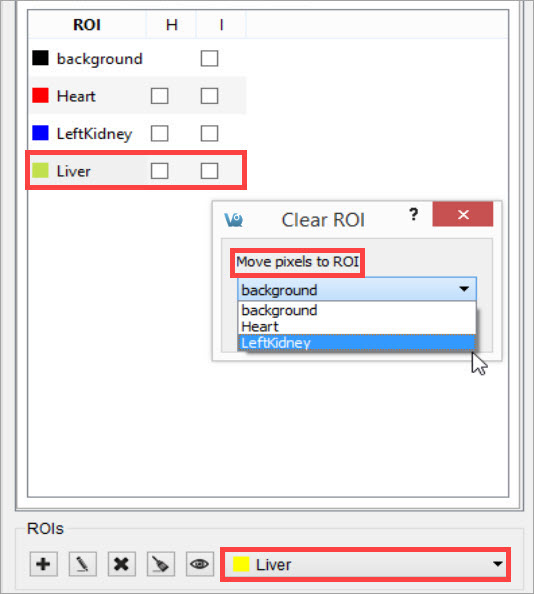
Another option is to select one or many of the existing ROIs, right click, and select Reset ROI.
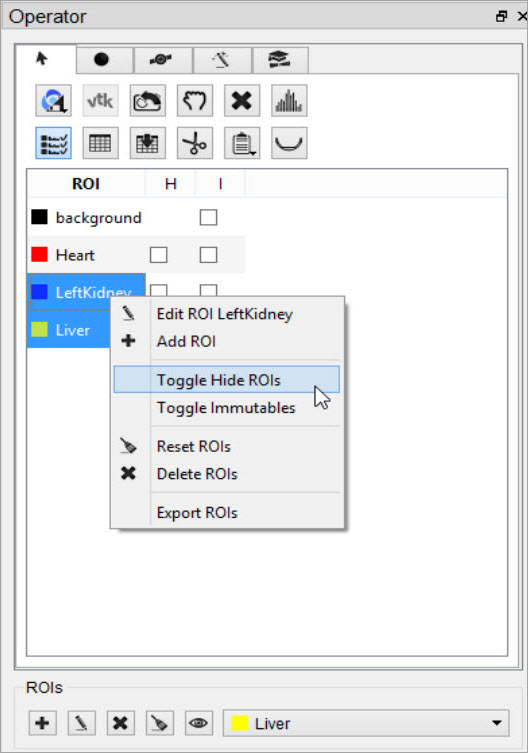
Hide an ROI
To hide an ROI in the slice and MIP views without deleting it, double-click the ROI to select it and click on the Hide ROI button ![]() .
.
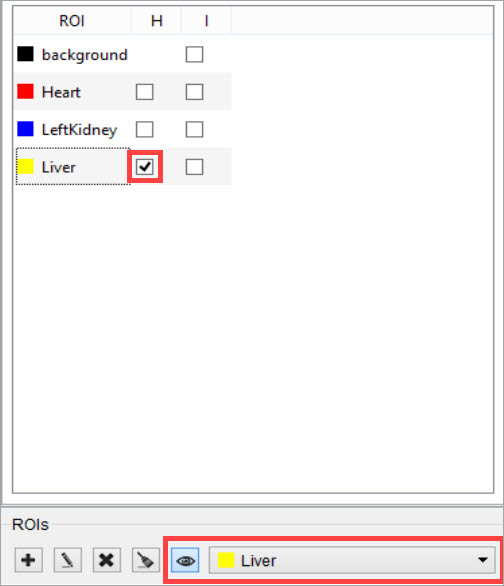
Another option is to select any one or all of the desired ROIs, right click, and select Toggle Hide ROI(s). All selected ROIs will become hidden.
ROI Loading, Saving, and Quantification Tools
The first tab in the 3D ROI Operator window features tools for basic input/output operations, quantification, and viewing functionality. To freely navigate through the slices with the cursor, this panel must be active.

The buttons in this tab perform several functions within the operator.
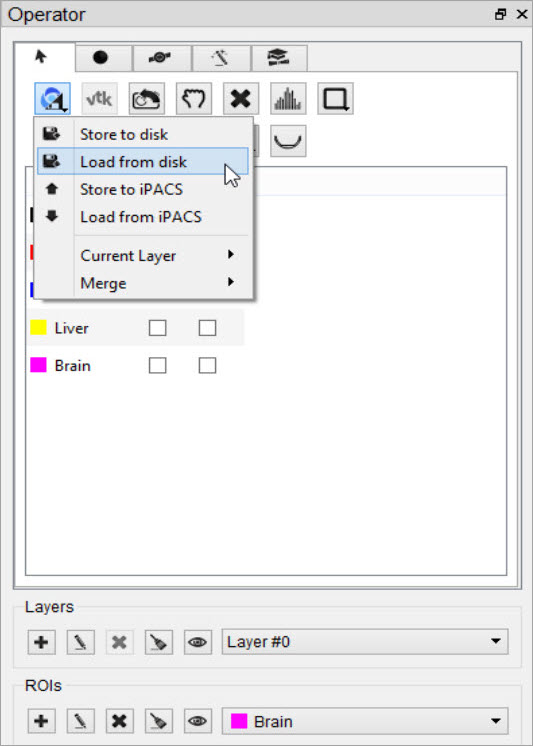
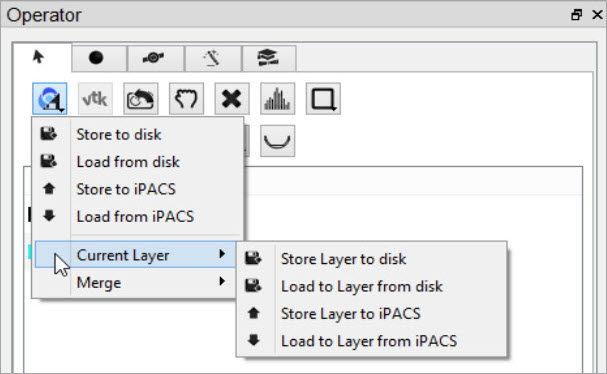
Load an ROI from Disk
The 3D ROI tool supports file formats of VQ 3D ROI (.rmha) and vtkStructuredPoints (.vtk). To load an ROI from disk, click the Load ROI button ![]() , select the Load from disk option and choose the desired ROI from the file browser.
, select the Load from disk option and choose the desired ROI from the file browser.
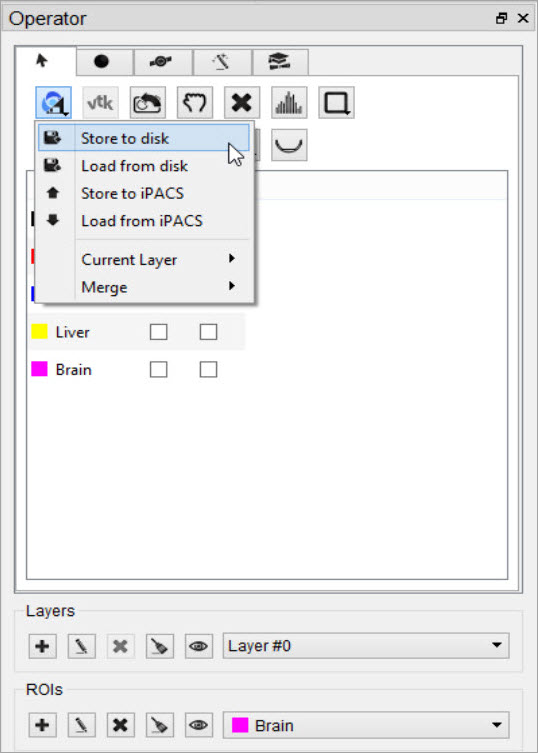
Save an ROI to Disk
To save an ROI to disk, click the Load ROI button ![]() , select the Store to disk option and specify a name and location for the file. The ROI will be written as an VQ 3D ROI (.rmha) file. All existing regions will be written to the same ROI file.
, select the Store to disk option and specify a name and location for the file. The ROI will be written as an VQ 3D ROI (.rmha) file. All existing regions will be written to the same ROI file.
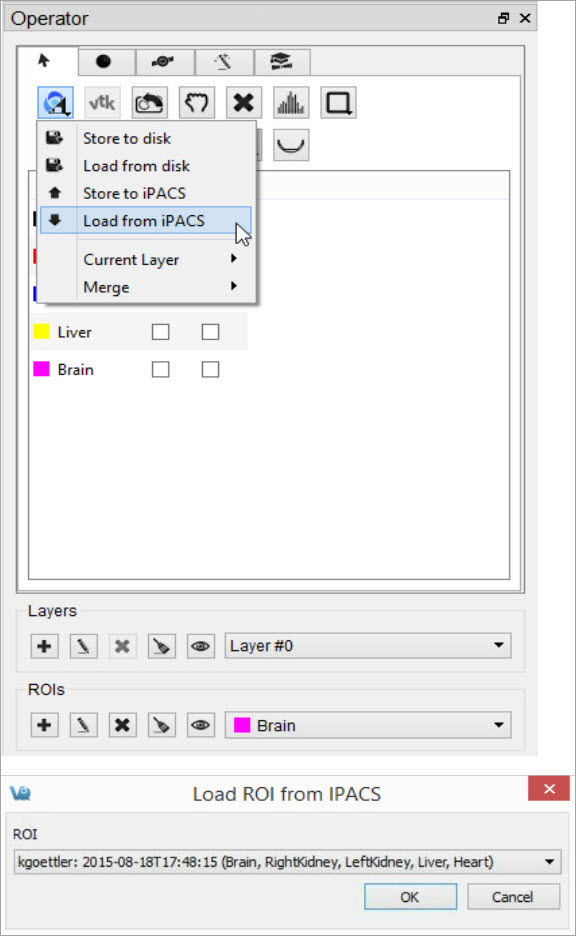
Load an ROI from an iPACS
To load an ROI from an iPACS, click the Load ROI button ![]() and select the Load from iPACS option. The image data currently loaded must have been retrieved from an iPACS, and there must be an ROI associated with that image already stored on the iPACS.
and select the Load from iPACS option. The image data currently loaded must have been retrieved from an iPACS, and there must be an ROI associated with that image already stored on the iPACS.
If only one ROI exists for the image, that ROI will automatically be loaded. If multiple ROIs exist, the user will be given a drop-down menu of available ROIs to choose from. The choices can be distinguished by ROI creator’s iPACS username, date and time of creation, as well as the region names for that file.
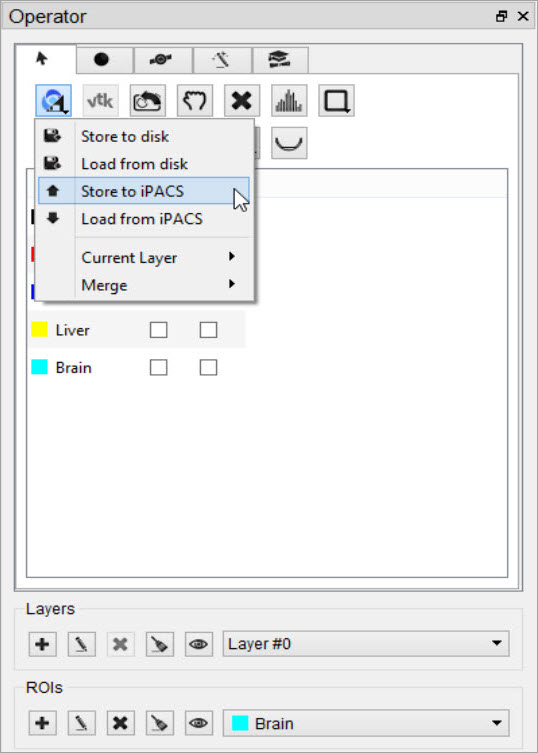
Save an ROI to an iPACS
To save an ROI to an iPACS, click the Load ROI button ![]() and select the Store to iPACS option. The ROI will be automatically associated with the current image. Unique filenames will be generated based on the creator’s username and the patient’s name from the image header. Previously saved ROIs will not be overwritten. The files will be saved to a subdirectory of the current project on the WebDisk, named
and select the Store to iPACS option. The ROI will be automatically associated with the current image. Unique filenames will be generated based on the creator’s username and the patient’s name from the image header. Previously saved ROIs will not be overwritten. The files will be saved to a subdirectory of the current project on the WebDisk, named roi.
Select Current Layer
By default, all layers are load or saved when loading or saving an ROI. However, the user can specify to save only a single layer by loading or saving the current layer.
Merge ROIs from an iPACS or Disk
To append previously stored ROIs to a set of ROIs currently open in the 3D ROI tool, click the Load ROI button ![]() and select Merge from iPACS or Merge from disk, depending on where the additional ROIs are stored. The additional ROIs associated with that image will be appended to the currently open ROI set in the 3D ROI viewer. Previously saved ROIs will not be overwritten.
and select Merge from iPACS or Merge from disk, depending on where the additional ROIs are stored. The additional ROIs associated with that image will be appended to the currently open ROI set in the 3D ROI viewer. Previously saved ROIs will not be overwritten.
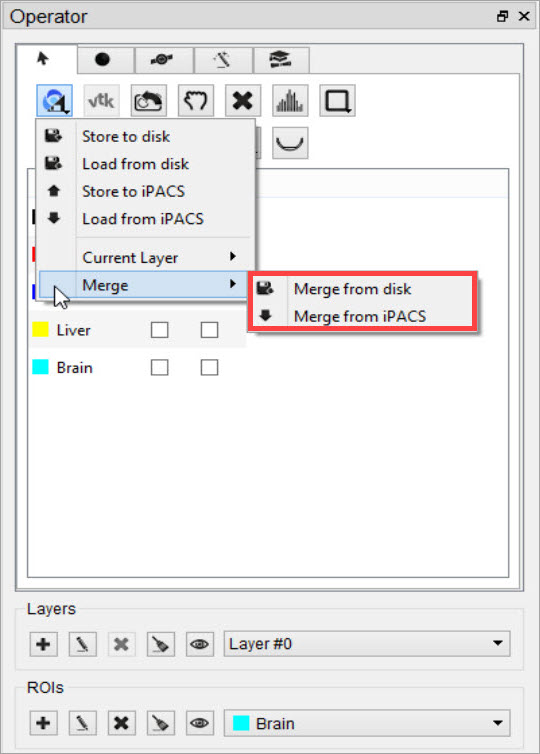
If there is any overlap of existing and merged ROIs, a new ROI will be created and named as a combination of the two ROIs listed names. For example, if a portion of a “Heart” and “Liver” ROI overlap after a merge, the new combined ROI created will be named “Heart/Liver”, and consist of only the specific volume of Heart and Liver that overlap.
To associate the combined ROI with the proper ROI, right-click the combined ROI and select Delete ROI. A popup window will open and allows the user to move the pixels of the selected ROI to either the background or another ROI. Selecting “background” will delete the ROI all together.
Center view on ROI
To center the field of view on the center of mass of a particular ROI, double click the ROI in the ROI Table.
Render ROIs in the MIP View
To trigger a new rendering of the current viewed ROIs in the MIP view, click the VTK button ![]() .
.
Reset the Camera View
To reset the MIP view to the original orientation and size, click the Reset Camera button ![]() .
.
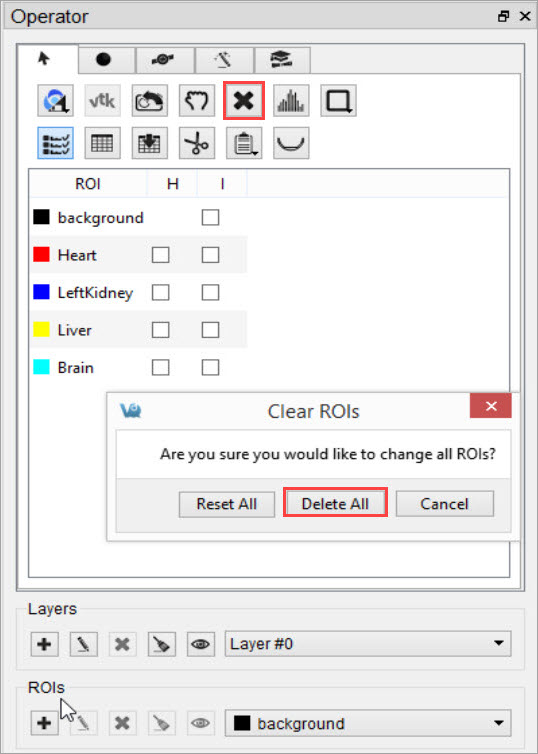
Reset all ROIs
To reset all existing ROIs, click the ![]() button and select Reset All. Empty ROIs will still exist under the same naming and coloring scheme.
button and select Reset All. Empty ROIs will still exist under the same naming and coloring scheme.
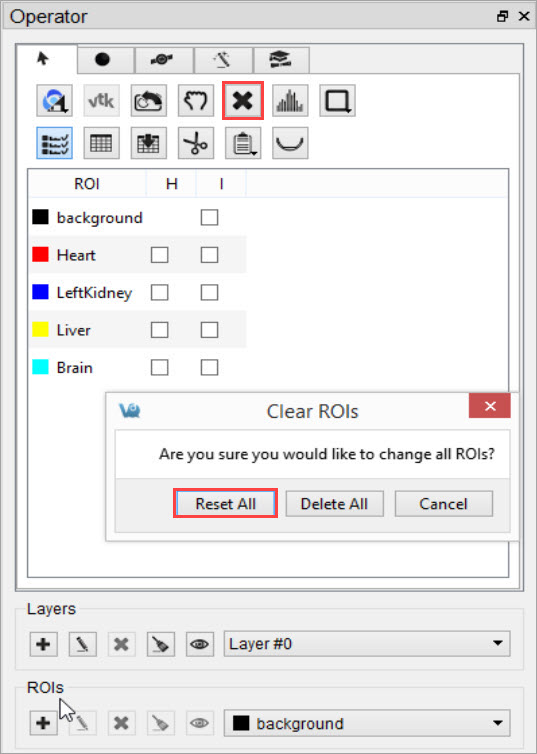
To delete all ROIs completely, click ![]() and select Delete All. The background will be the only thing left in the ROI menu.
and select Delete All. The background will be the only thing left in the ROI menu.
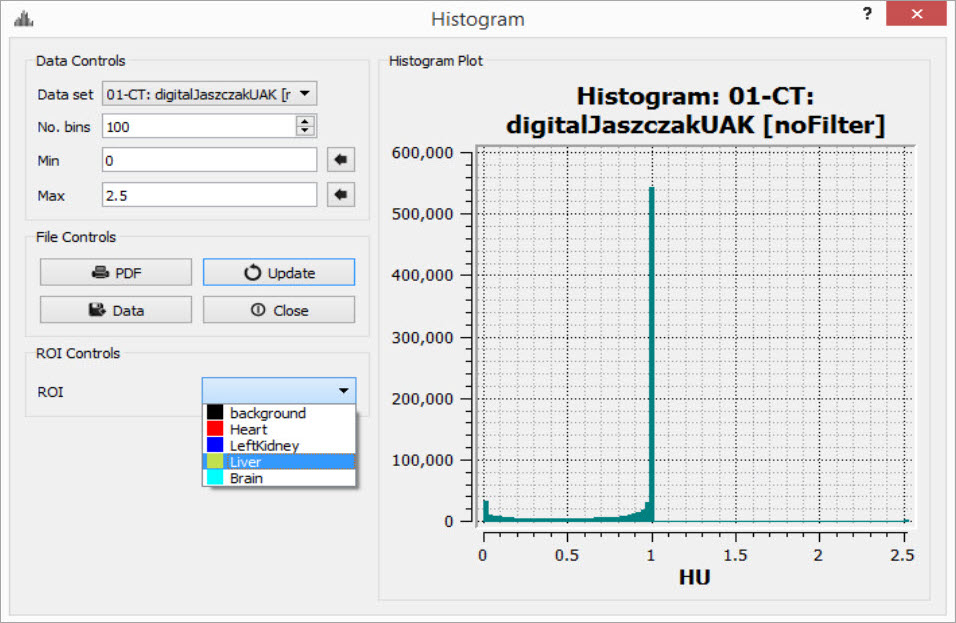
Show the Image Histogram
To view a histogram of the image or any subset of the image determined by an ROI, click the Show Histogram ![]() button. Choose the image used to generate the histogram by selecting it from the Data Set drop-down menu. The portion of the image contributing to the histogram can be set under the ROI Controls by selecting an ROI from the drop-down menu.
button. Choose the image used to generate the histogram by selecting it from the Data Set drop-down menu. The portion of the image contributing to the histogram can be set under the ROI Controls by selecting an ROI from the drop-down menu.
Set Quantification Table Columns
To determine which quantitative fields will be displayed in the quantification table and stored to the iPACS, if applicable, go to the Operator tab on the main menu, then select Quantification Table List.
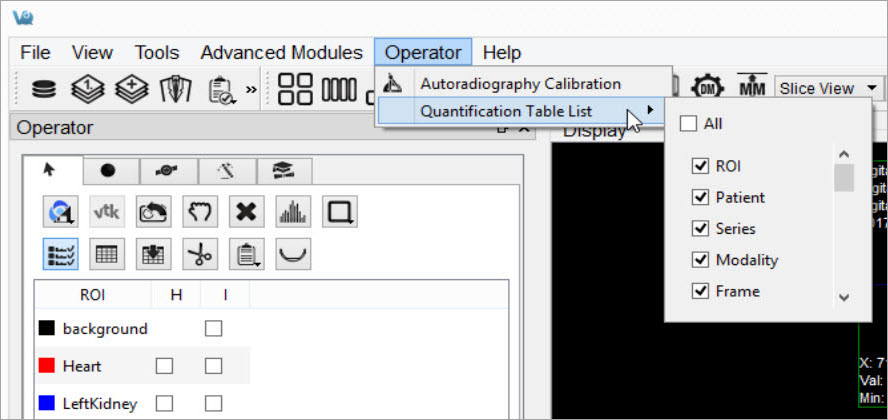
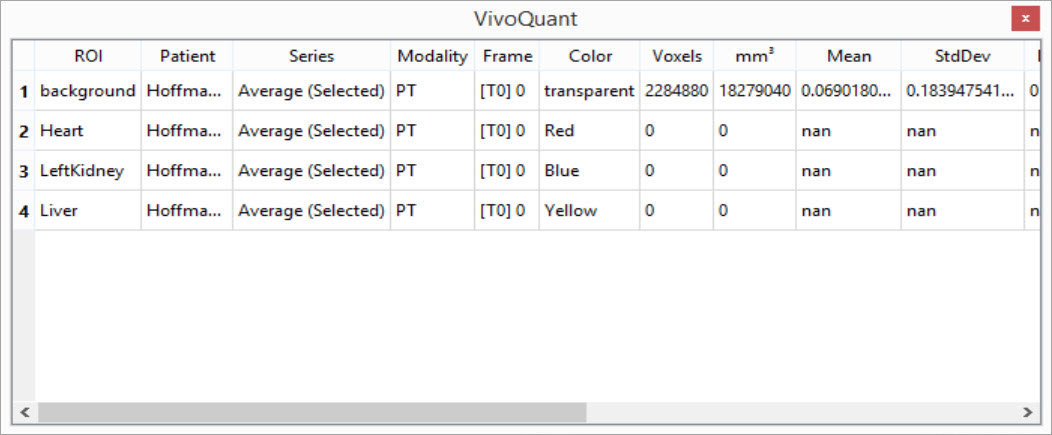
The available quantification values are described below:
| Option | Description |
|---|---|
| ROI | Name of the ROI. You can left-click this field to enter comments. |
| Patient | Patient’s name for the current study. |
| Series | Specific data set in the study from which the data was calculated. |
| Modality | Modality from which the data values for the row were calculated. |
| Color | Color of the ROI as drawn in the display. |
| Voxels | Total number of voxels contained in the selected ROI. |
| Volume | Volume of the selected ROI in units of cubic millimeters. |
| Mean | Arithmetic mean of values of voxels contained in the ROI. |
| StdDev | Standard Deviation of values of voxels contained in the ROI. |
| Min | Minimum value of all voxels contained in the ROI. |
| Max | Maximum value of all voxels contained in the ROI. |
| Median | Median value of all voxels contained in the ROI. |
| Sum | Sum of all voxels contained in the ROI, sometimes interchangeable with ‘Uptake’ |
| Unit | Unit of voxels in the selected dataset. |
| Conc 10% | Concentration (mean/volume) of the 10th Percentile of voxels contained in the ROI. |
| Conc 50% | Concentration (mean/volume) of the 50th Percentile of voxels contained in the ROI. |
| Conc Peakregion | Concentration (mean/volume) of the 3x3x3 cube of voxels with the greatest mean of all 3x3x3 cubes of voxels contained within the ROI. Referred to below as Highest-uptake region. |
| Conc Peakmax | Concentration (mean/volume) of the 3x3x3 cube of voxels that has at its center the maximum voxel of the voxels contained in the ROI. Referred to below as SUVmax. |
| Conc Max | Concentration (mean/volume) of the maximum voxel of the voxels contained in the ROI. |
| Conc | Concentration (mean/volume) of all the voxels contained in the ROI. |
| Conc Unit | Unit of voxels in the selected data set over volume (mm3). |
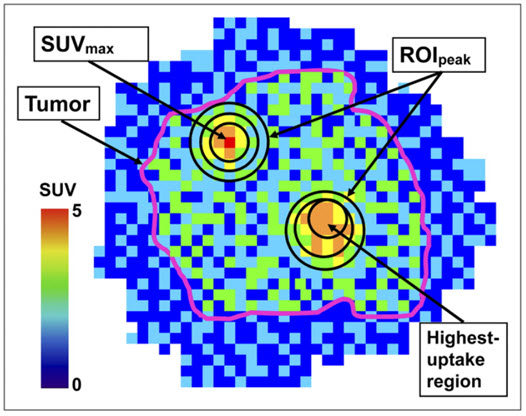
“Impact of the Definition of Peak Standardized Uptake Value on Quantification of Treatment Response”. Vanderhoek, et al. J Nuclear Medicine, 2012. Link.
Show the quantification table.
To display the quantification table, including all existing ROIs, click the Show Table button ![]() .
.
Export the quantification table to disk.
To export the quantification table to disk as a comma-separated values (.csv) file, click the Export Table button ![]() .
.
Perform a cut on an image using an ROI.
To remove voxels from image data based on an ROI, choose the desired ROI from the ROI selector and click the Cut ROI button ![]() . All visible images will be cut and the ROI will remain unchanged. The cut tool is useful for eliminating undesired features in images, such as metal instrumentation that may appear in some CTs.
. All visible images will be cut and the ROI will remain unchanged. The cut tool is useful for eliminating undesired features in images, such as metal instrumentation that may appear in some CTs.
Show or Hide an ROI
To hide an ROI, Check the boxes in the H column. An ROI can also be hidden by selecting it and clicking on the Hide/Show button ![]() .
.
Copy or Paste the 3D ROI
Click the Copy/Paste ROI button ![]() to copy and/or paste ROIs between instances of VivoQuant.
to copy and/or paste ROIs between instances of VivoQuant.
Export ROIs into the Bed Removal Tool
Click the Export to Bed Removal button ![]() to export ROIs into VivoQuant’s Bed Removal tool.
to export ROIs into VivoQuant’s Bed Removal tool.
Import Layers and ROIs with Overlapping Regions New Feature
Certain image formats, such as PMOD VOI and DICOM RTSTRUCT, support overlapping regions inherently. VivoQuant’s 3D ROI tool loaders have been updated to handle the overlap appropriately.
Not only has the 3D ROI Tool been updated to be compatible with overlapping ROIs, but numerous pre-existing features also successfully operate on the active layer supporting overlapping ROIs. These include: Segmentation Algorithms, Painting in the slice views, Tooltip Pixel hovers, Reorientation Operator, Modeling Operator, Multi-view Visibility, VTK MIP, AutoRAD, MAS, Brain Atlas and Smoothing Operator.
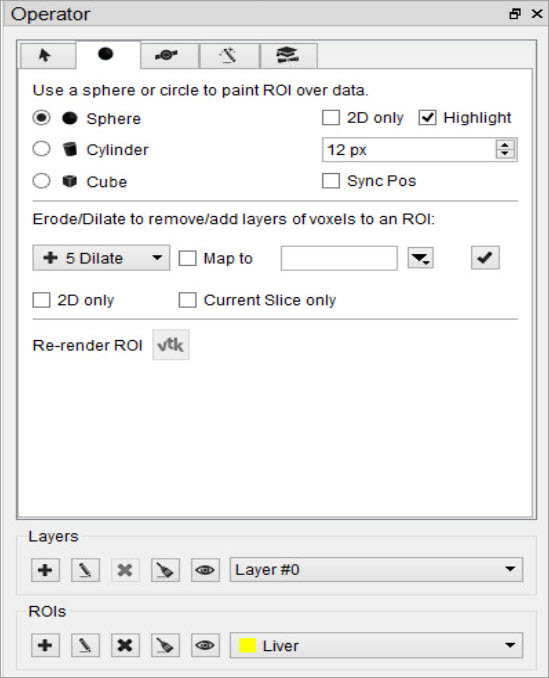
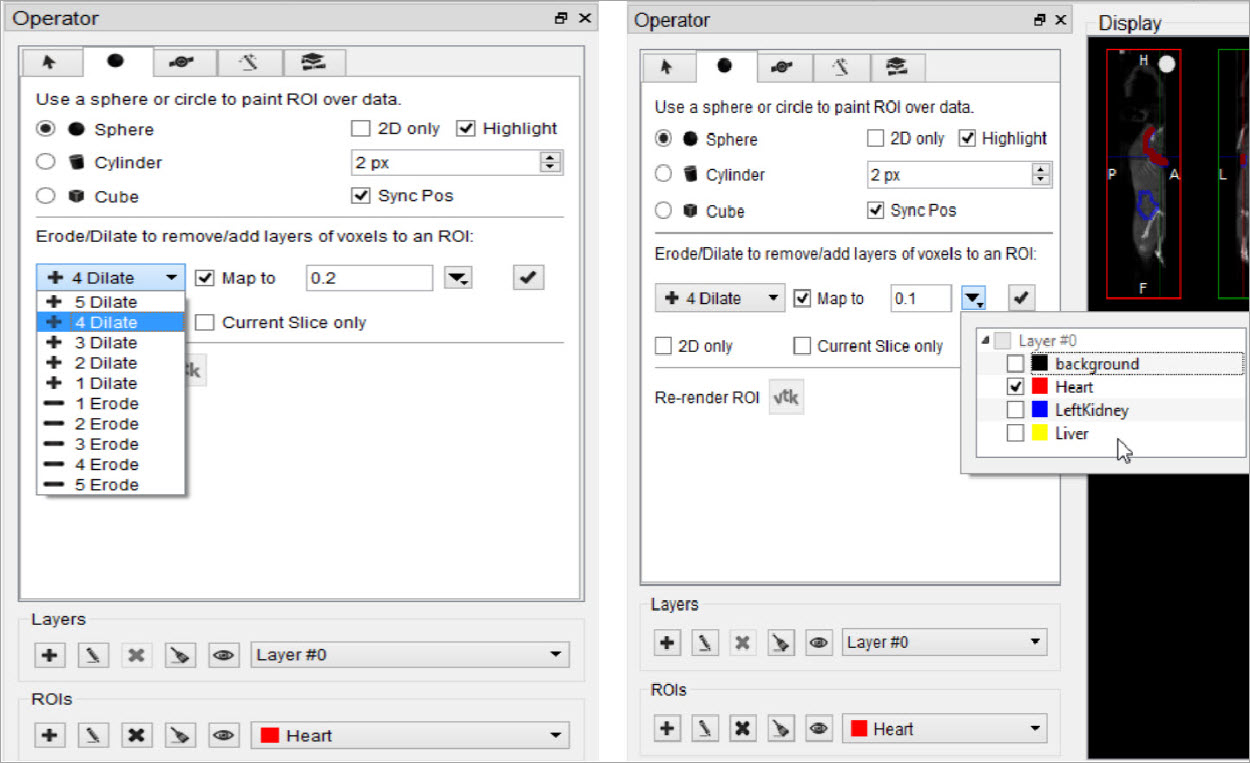
Painting Tools
There are several paintbrushes to choose from when creating an ROI. The sphere ![]() , cylinder
, cylinder![]() , or
, or ![]() cube paintbrush can be selected by clicking the corresponding radiobutton on the Painting tab
cube paintbrush can be selected by clicking the corresponding radiobutton on the Painting tab ![]() . The radius of the paintbrush can be set by changing the number of pixels shown in the numerical spin box. These 3D paintbrushes extend across multiple slices. To activate 2D mode, mark the ‘2D only’ checkbox. In 2D mode, the paintbrush will only paint on the current slice.
. The radius of the paintbrush can be set by changing the number of pixels shown in the numerical spin box. These 3D paintbrushes extend across multiple slices. To activate 2D mode, mark the ‘2D only’ checkbox. In 2D mode, the paintbrush will only paint on the current slice.
ROIs can be drawn freely on any of the three slice views. The view currently being drawn in will be denoted as Active in the upper left corner.
Each voxel can only belong to a single ROI. Painting over an existing ROI with a new ROI will place the painted voxels in the new ROI, unless the existing ROI is immutable. (See Edit an ROI to learn how to make an ROI immutable.)
To erase voxels from an existing ROI, paint over the existing ROI with the ROI selector set to Background. Alternatively, set the ROI selector to the existing ROI (from which to erase voxels) and hold down the Shift key while drawing. The Shift key activates the background ROI for the painting tool, even if another ROI is set in the ROI selector.
Sync Pos
If “Sync Pos” is checked, then the non-Active slice views will be updated in real time to match the position of the drawing tool on the Active slice. When this option is selected, drawing times will typically be slower.
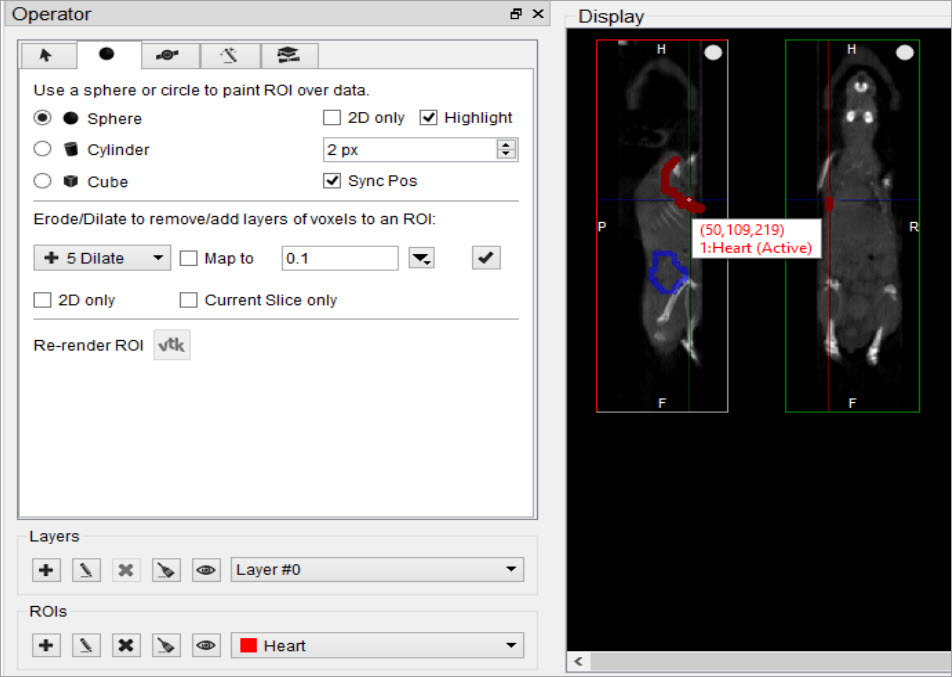
Erode/Dilate.
The Erode/Dilate tool can be used to remove or add up to 5 layers of voxels from the input ROI. The erosion or dilation will be applied to the currently selected ROI in the ROI selector.
If you would like the voxels that are being added or removed from the ROI to be put in an ROI other than the one currently selected, mark the ‘Map to’ checkbox and choose the ROI to put the new voxels in from the drop-down menu to the right ![]() .
.
To perform the erosion or dilation, click the Checkmark button ![]() .
.
2D Drawing Tools
The 2D drawing tools match the options available within the Projection++ Tool.
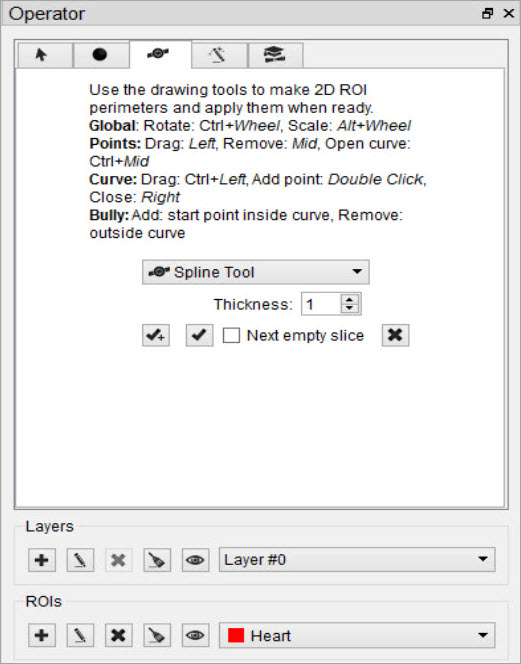
Choose the desired tool from the drop-down menu to begin drawing. Use the ![]() button to delete a contour (this will not delete the ROI). Use the
button to delete a contour (this will not delete the ROI). Use the ![]() button to add the voxels within a drawn contour to the currently selected ROI.
button to add the voxels within a drawn contour to the currently selected ROI.
| Spline tool | |
| Bully tool | |
| Freehand tool | |
| 2D Thresholding tool |
Spline Tool
Use the spline tool to define points between which smooth curves will be filled in. The base points can be moved by using the left mouse button to drag them. Additionally, points can be deleted by click on a middle point, or added by double clicking on a curve. Once a shape has been closed by clicking the right mouse button, it can be re-opened by hitting Shift + middle click on a point.
Bully Tool
Use the bully tool to nudge the drawn boundary inward or outward with a circle-shaped cursor. The cursor size can be changed using the paintbrush size selector in the Painting Tools panel. This mode provides an efficient way to fine-tune an ROI made in Spline or Freehand mode. You may select which image data you want to use as the input (“Ref” is the first image loaded in the Data Manager, “Inp1” is the second, etc.) and the thickness of the tool, in the bully tool and for the following three tools as well.
Freehand Tool
A freehand region may be drawn by moving the mouse while holding down the left mouse button. The region may be drawn in segments through a series left clicks and closed with a right click.
2D Thresholding Tool
Use the Percentage selector field to set a threshold for the ROI. Specify the image on which to base the thresholding using the drop-down menu.
| Apply Spline Path to ROI and move to next slice | |
| Apply Spline Path to ROI | |
| Clear Spline Path |
Apply Spline Path to ROI and move to next slice.
This button creates a 2D ROI within the spline path and moves to next slice.
Apply Spline Path to ROI
This button creates a 2D ROI within the spline path.
Clear Spline Path
This button clears the spline path and all points.
3D Segmentation Tools
The 3D Segmentation Tools are located in the Segmentation Algorithms tab ![]() . They be used to apply different thresholding techniques across input images and user-defined ROIs, as well as advanced ROI processing.
. They be used to apply different thresholding techniques across input images and user-defined ROIs, as well as advanced ROI processing.
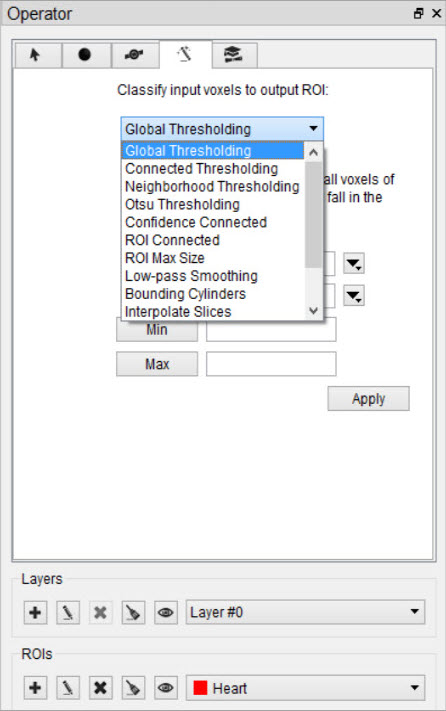
Setting the Input and Output ROI
The Input ROI must be selected from the Input drop-down menu before applying thresholding. If an ROI other than the background is selected, only image pixels within the chosen ROI will be considered when thresholding is performed.
The Output ROI is the ROI specified in the ROI drop-down menu located at the bottom of the 3D ROI Operator window. If the Output ROI is not empty prior to thresholding, the result of the thresholding will be added to the existing voxels of the Output ROI.
Keep in mind that other ROIs may be overwritten if the result of a thresholding technique intersects them. To prevent other ROIs from being altered, set them to immutable. (See Edit an ROI to learn how to make an ROI immutable.)
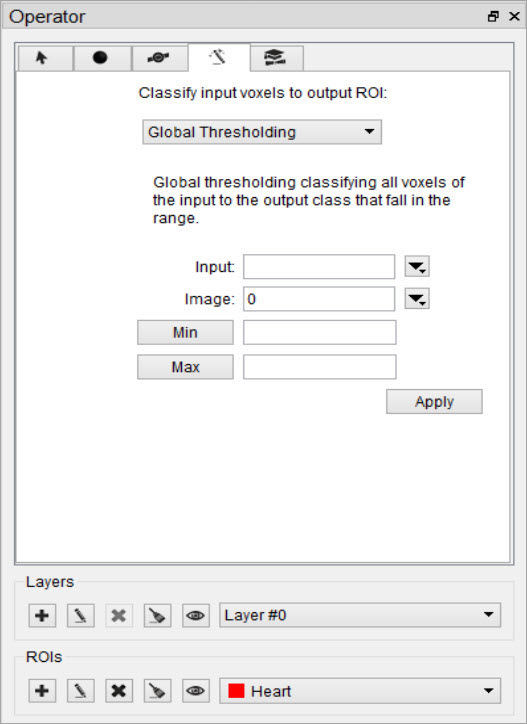
Choosing the Image Data
The segmentation algorithm will work on the data from the image specified in the Image drop-down.
Setting the Seed Point
For methods that require a seed, the cursor location at the time the thresholding is performed will be used.
Setting the Thresholds
For methods that require thresholds, use the number fields beneath the Image Selection drop-down. Click the Min and Max buttons to the left of each threshold field to fill in the minimum and maximum values, respectively, from the selected image. The unit is assumed to match that specified in the header.
Available Thresholding Methods
The thresholding methods available can be selected from the Segmentation Algorithm drop-down menu. After selecting a seed and thresholds as necessary, click ‘Apply’ to perform the segmentation. The thresholding operation may take about a minute to complete.
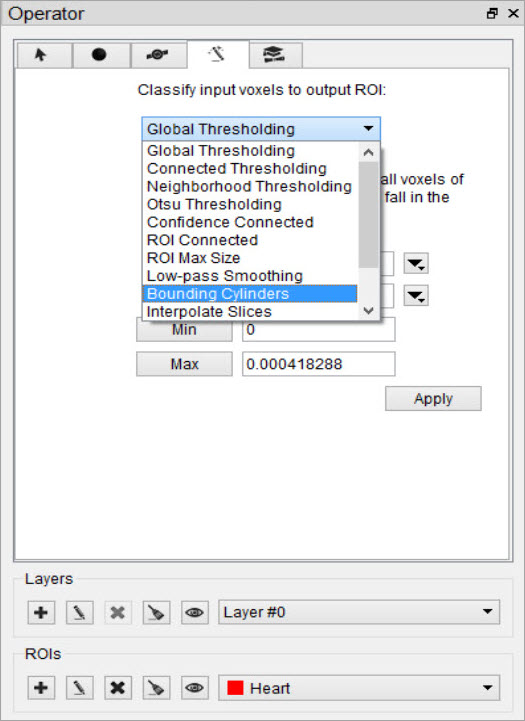
| Requires Seed? | Requires Thresholds? | |
|---|---|---|
| Global Thresholding | No | Yes |
| Connected Thresholding | Yes | Yes |
| Neighborhood Thresholding | Yes | Yes |
| Otsu Thresholding | No | Yes |
| Confidence Connected | Yes | No |
| ROI Connected | Yes | No |
| ROI Max Size | No | No |
| Low-pass Smoothing | No | No |
| Bounding Cylinders | No | No |
| Interpolate Slices | No | No |
| Modal Smoothing | No | No |
| Connected Components | No | No |
| K-Means Clustering | Yes | No |
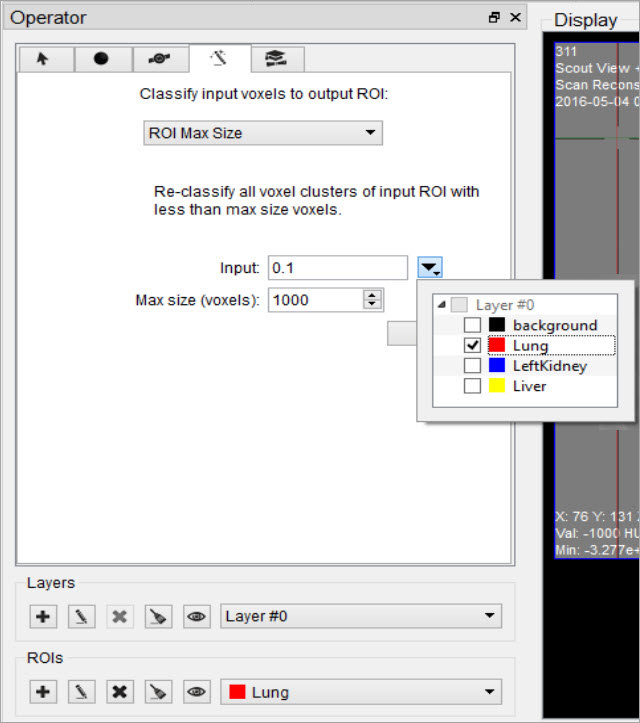
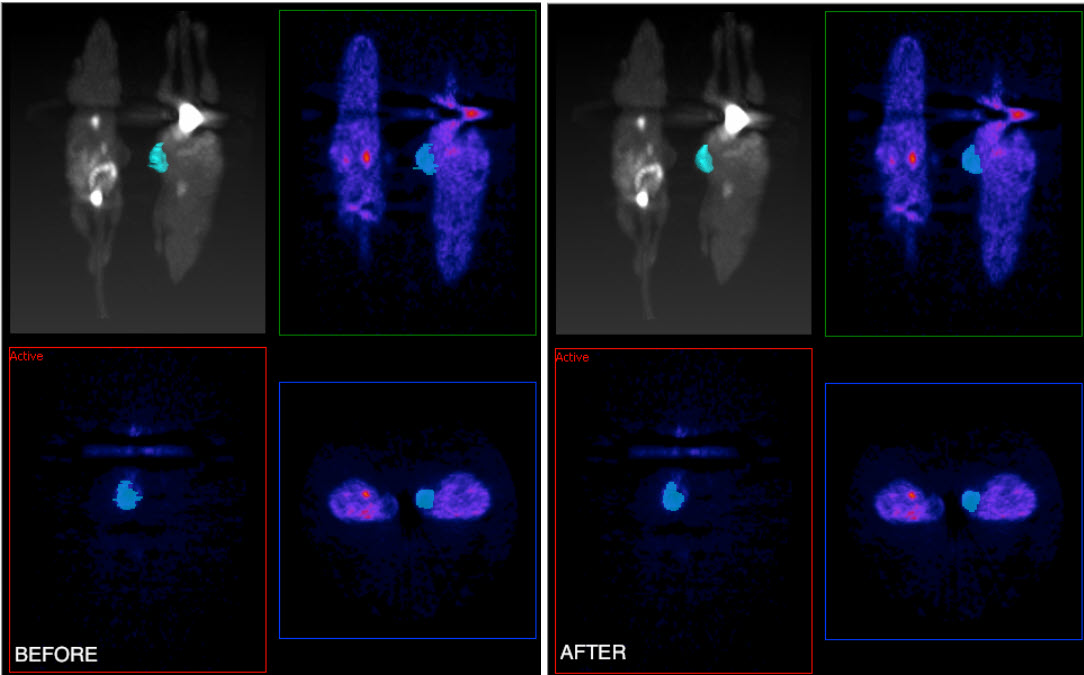
ROI Max Size
The ROI Max Size filter can be used to fill holes in existing ROIs. Any connected components in the Input ROI that are comprised of fewer voxels than the Max size specified will be mapped to the output ROI.

Low-pass Smoothing
Use the Low-pass Smoothing filter to remove jagged surfaces from manually created ROIs. The amount of smoothing can be controlled with the Low-pass radius parameter. Smaller radii will result in smoother ROIs.

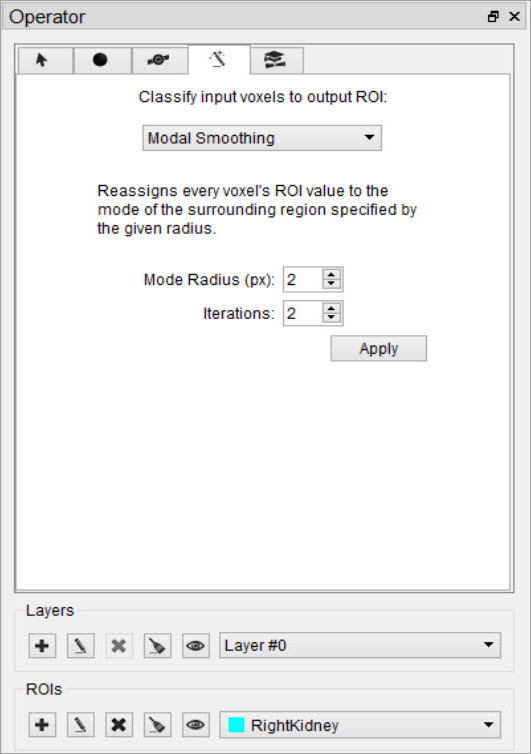
Modal Smoothing
Use modal smoothing to reassign every voxel’s ROI value to the mode of the surrounding region specified by the given radius. The amount of smoothing can be controlled by the Mode Radius and Iterations parameters.
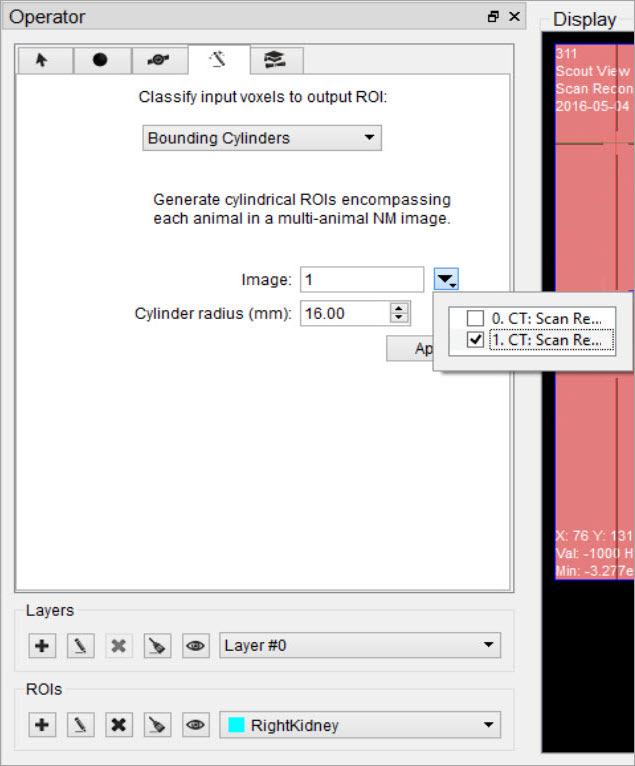
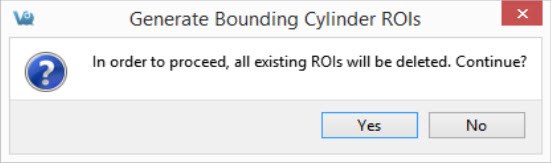
Bounding Cylinders
The Bounding Cylinders tool can be used to generate cylindrical ROIs that encompass each animal of a multi-animal image. The number of animals is automatically determined and the cylinder radius can be configured. This algorithm works best on NM images, but may also work on some CT images.
Expert Settings
The Expert tab, presents the advanced settings of the 3D ROI Operator. For the typical user, these settings will not need to be changed.
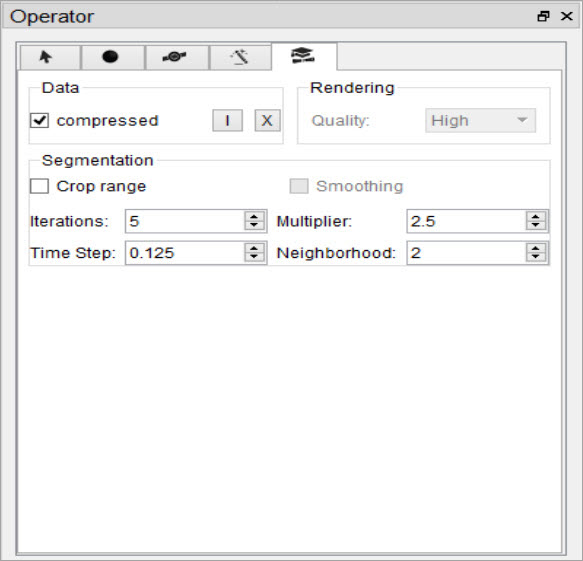
Data Group
By default, VQ ROIs are written in a compressed format. To extend compatibility with other tools (e.g., ITK), uncheck “compressed.” If the ROI files will only be used within VQ, leave the “compressed” box checked.
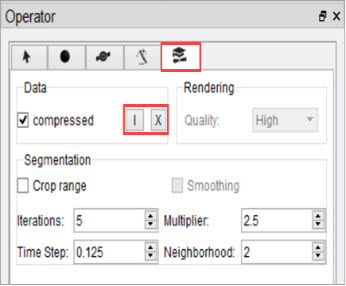
Importing and Exporting ROIs
To import an ROI loaded in the Data Manager from an image file, click the Import button ![]() and select the corresponding dataset to import. To export a 3D ROI as an image to allow manipulations outside of the 3D ROI tool, click the Export button
and select the corresponding dataset to import. To export a 3D ROI as an image to allow manipulations outside of the 3D ROI tool, click the Export button ![]() .
.
Rendering
If “auto” is checked, ROIs will be re-rendered in the MIP view automatically upon certain triggers. When unchecked, rendering will only occur when the VTK button is used. For systems with less speed and memory, it may be helpful to select a less demanding setting from the rendering quality combo box.
Segmentation
To add a curvature flow smoothing preprocessing step to the segmentation methods, check the “Smoothing” box. Use the Segmentation fields to tune up the parameters of the segmentation methods. The Smoothing filter will use the Iterations and Time Step settings; the Confidence Connected Thresholding will use the Multiplier and NeighborRad (neighborhood radius) settings; the Neighborhoood Thresholding will use the NeighborRad setting.
Crop Range
To perform any of the thresholding segmentation methods on only a sub-region of the input image, follow these steps:
-
Open the Cropping operator from the Operators drop-down menu.
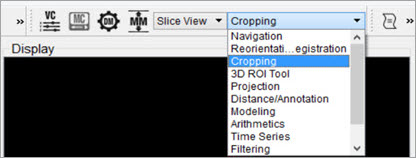
-
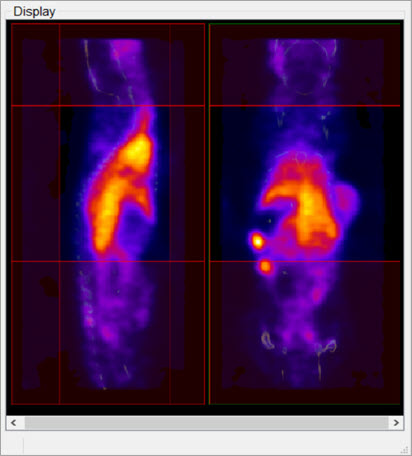
Use the red sliders to select the desired region of the image.
- After you’ve selected the desired region, go back to the 3D ROI tool by selecting the 3D ROI operator from the Operators drop-down menu.
-
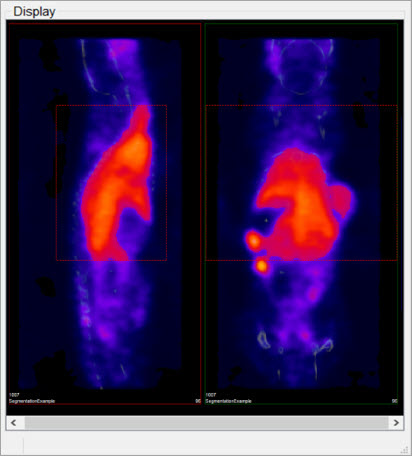
In the Expert tab of the 3D ROI Operator, mark the Crop Range checkbox. Dashed red lines will appear on the image, indicating the boundaries of the selected region.
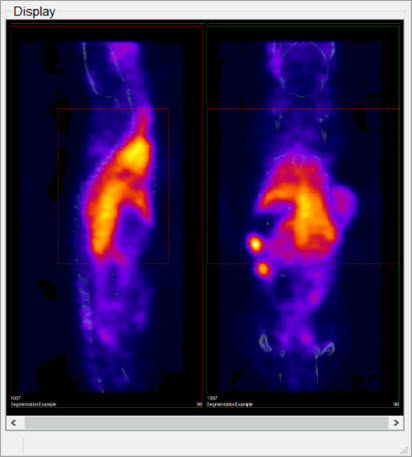
- When the desired thresholding method is performed (see Segmentation Tools to learn how to use the Segmentation panel of the 3D ROI Operator), only the region within the crop range will be segmented.
Undo/Redo Functionality
To undo/redo operations performed in the 3D ROI tool go to the View tab on ViviQuant’s main menu and click the Undo ![]() or Redo
or Redo ![]() button. The operation to be undone or redone will be described in the drop-down menu.Keyboard shortcuts are also available for undoing or redoing an operation.
button. The operation to be undone or redone will be described in the drop-down menu.Keyboard shortcuts are also available for undoing or redoing an operation.

The undo/redo functionalities are applicable to all functions performed on 3D ROI data itself. Operations performed to actual volume image data cannot be undone or redone. For example, performing a cut on an image using an ROI cannot be undone since it is applied to actual volume data and not just 3D ROI data.