The Reorientation/Registration Tool enables manual and automatic realignment of image data via translation, rotation, or flipping. Reference and input data may be manipulated separately, and specific translation settings may be saved and/or loaded for future studies, including the option for setting automatically applied default image shifts.
Getting There
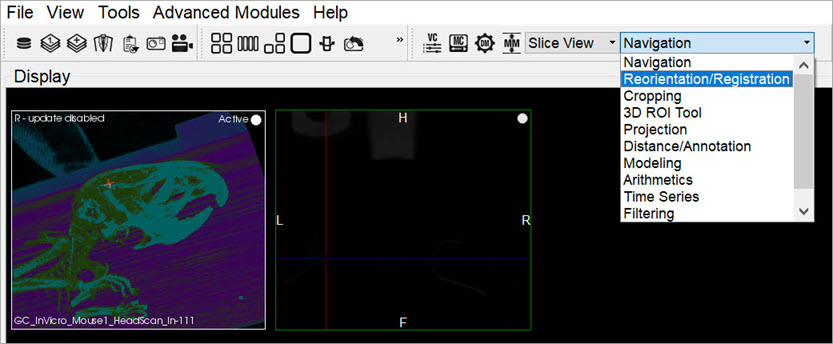
The Reorientation/Registration Tool can be accessed via the tool pull-down menu on VivoQuant’s front panel.
Using the Tool
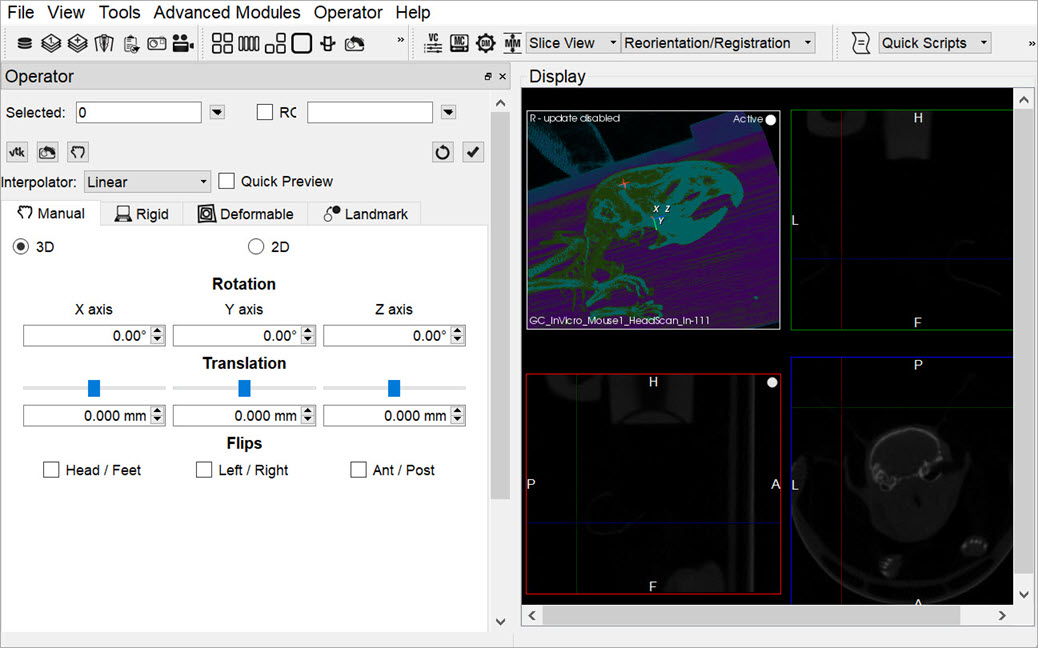
Upon selecting the tool, the Reorientation/Registration operator window is displayed.
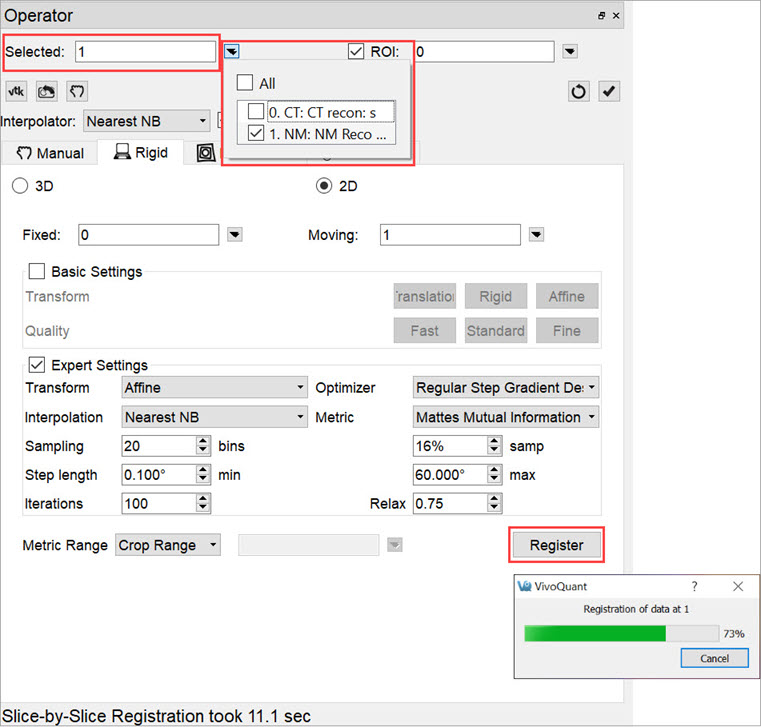
The Data Selector Widget is used to determine which inputs will be reoriented by the Operator.
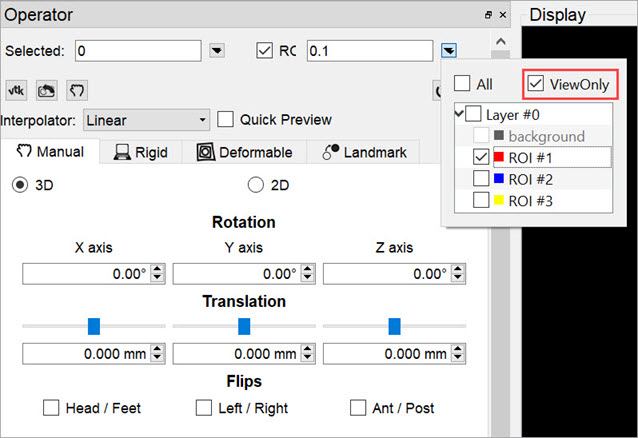
ROIs can be selected by checking the ROI checkbox. By default, all ROIs will be subject to reorientation when the ROI box is checked. If you wish to select only specific ROIs, click on the pull-down menu and select the desired ROIs. You may also choose to simply view the ROIs while performing a reorientation, without performing the reorientation on the ROIs themselves, by selecting View Only from the ROI pull-down menu.
The buttons at the top of the operator window perform various functions within the operator.
| Option | Description |
|---|---|
| Force re-render of VTK Viewer | |
| Reset VTK Viewer position | |
| Toggle ability to perform reorientation in VTK Viewer | |
| Resets current reorientation operation | |
| Apply current reorientation operation |
The Interpolator drop down menu designates which interpolator will be used during the transformation. The default interpolator value is Linear.
The Quick Preview option enables VivoQuant to generate a low resolution preview of an automatic registration. Users can apply by clicking Apply in the Operator menu.
3D and 2D Manual Options
3D and 2D manual registration options are available in the first tab of the operator. Images/ROIs can be rotated up to 360 degrees around their X, Y and Z axis; translated in any direction along their X, Y and Z axis; and scaled in any dimension. The reorientation will be performed on all images/ROIs selected at the top of the operator window.

- Rotation is completed by either using the up and down buttons next to the box or by typing in the number of degrees you wish to rotate the image. Once the desired positioning has been achieved, click ‘OK’ to apply the transformation.
- Translation is achieved by scrolling the bar to the left or the right or typing in the number of mm to be moved in the box below. Translation can also be achieved by holding the “Ctl” button on the keyboard and dragging images in the Viewports.
- Flips can be performed about any of the three axes by selecting the check box for Head/Foot, Left/Right, or Anterior/Posterior.
- Scaling can be enabled in the Operator menu. When enabled, images and ROIs can be scaled during reorientation by scrolling the bar to the left or right or typing in the % by which to scale. To scale uniformly in all three dimensions, check the “Uniform” box.
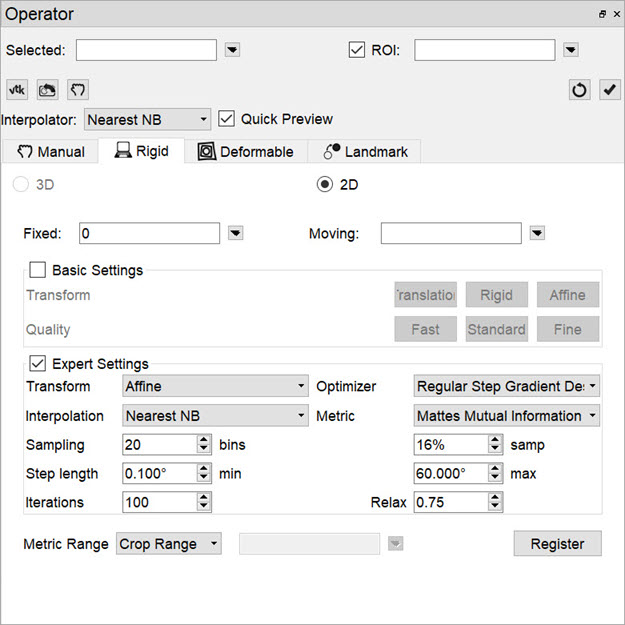
3D and 2D Automatic Options
3D and 2D automatic registration options can be found in the second tab of the operator. There are Basic Settings (default) and Expert Settings available for each type of automatic registration.
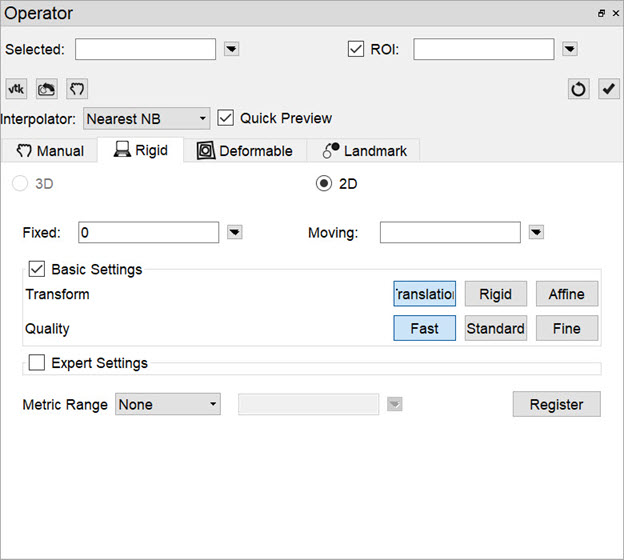
The default options for registering data include Translation, Rigid and Affine. The Translation registration is a rigid registration which will shift the input data set in the (x,y,z) directions. The Rigid registration will rotate and translate the input data set. The Affine registration is a linear transformation which will rotate, translate, shear and scale the input data set.
The Expert Settings are intended for experienced users only and provide access to a variety of transform, optimization, interpolation, and metric (figure-of-merit) schemes. User-configurable fields are also provided for the number of sampling bins, minimum and maximum step length, maximum number of iterations, percentage of voxels to be used for registration, and a relaxation factor.
A crop range can also be defined which, when enabled, will perform the registration optimization calculations based solely on the voxels within the crop range. This can be useful when images have noise, regions of little to no signal, or other artifacts that may affect optimization calculations. For information about setting a crop range, see Crop Range under Expert Settings on the 3D ROI Tool page.
To begin the registration, select the desired dataset and click Register. A window will appear that shows information about the progress of the optimization.
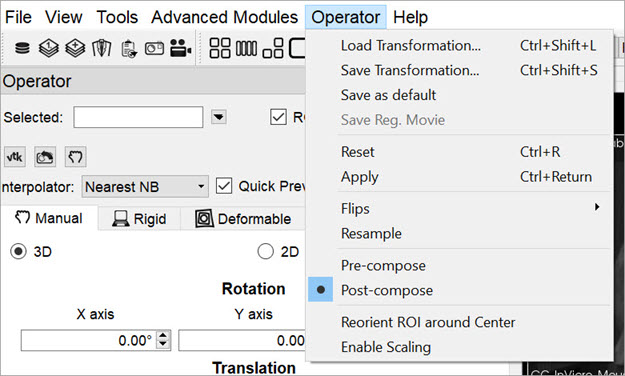
Menu Options
The Reorientation/Registration operator menu can be used for storing transformations, setting a default image transformation, and controlling the behavior of the operator.
| Option | Keyboard Shortcut | Description |
|---|---|---|
| Load Transformation… | Ctrl+Shift+L | Applies a pre-defined transformation to the active data set. |
| Save Transformation… | Ctrl+Shift+S | Saves the current transformation settings (rotation, translation, flips) into a .xml file. |
| Save as default | Saves the current transformation settings (rotation, translation, flips) as default settings for image data. If the Apply Default Shift checkbox is selected, these settings will be automatically applied to any image data that then gets loaded. See the How To Guide for more on setting a default image shift. | |
| Reset | Ctrl+R | Resets all transformation settings (rotation, translation, flips) back to the default values. |
| Apply | Ctrl+Return | Applies the current transformation settings (rotation, translation, flips) to the active data set. |
| Flips | Provides the option of flipping the data in any of three directions, described as Head/Feet, Left/Right, and Anterior/Posterior. | |
| Resample | Directs the user to the Resample Data tool. The Resample Data tool allows rebinning of reconstructed data into an arbitrary voxel size. | |
| Pre-compose | Transformation which applies T1 to the source, and then applies T2 to that result to obtain the target. | |
| Post-compose | Transformation which applies T2 to the source, and then applies T1 to that result to obtain the target. | |
| Reorient ROI around center | Sets reference point for transformation as center of ROI instead of center of image. | |
| Enable scaling | Toggles appearance of Scaling under 3D and 2D manual registration panels. |
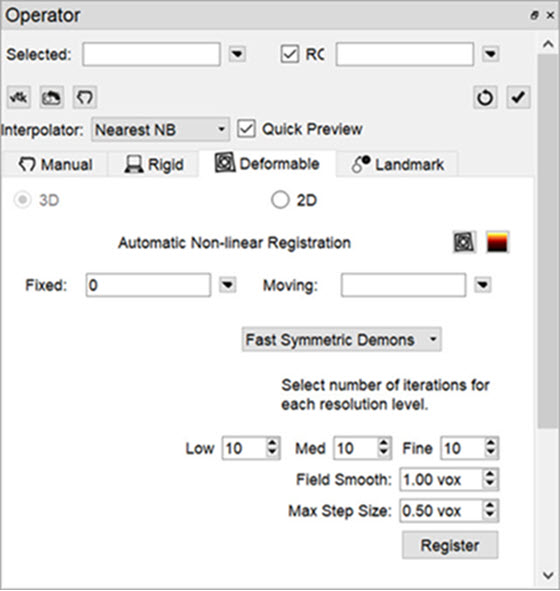
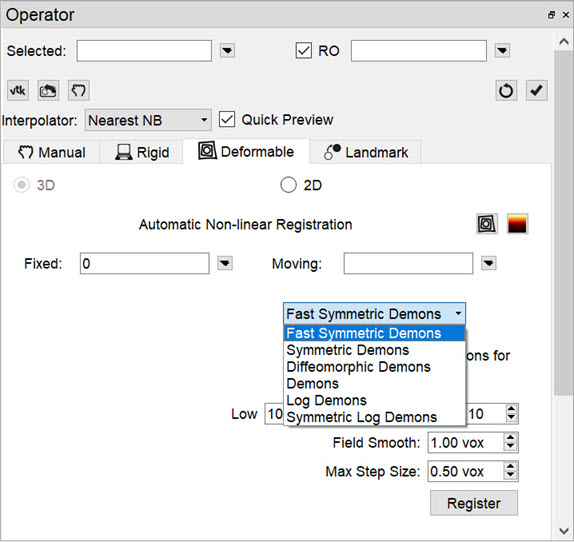
Automatic Non-Linear Registration
The 3D Automatic Non-Linear Registration tool provides deformable registration of the data by computing a unique transformation matrix for all voxels of data represented. After selecting your preference from the dropdown, the number of iterations for each resolution level can be adjusted. Drop-down preferences include: Fast Symmetrical Demons, Symmetric Demons, Diffeomorphic Demons, and Demons. To show the deformed grid overlaid or a heatmap of the Deformable vector field over of the image, use the toggle buttons.
To learn more about the Non-Linear Registration techniques please visit the link below:
Automatic Slice-by-Slice Non-Linear Registration
The 2D Automatic Slice-by-Slice Non-Linear Registration tool provides deformable registration of the data by computing individual transformation matrices for each voxel of data represented. After selecting your preference from the dropdown, the number of iterations for each resolution level can be adjusted.
To learn more about the Non-Linear Registration techniques please visit the link below:
How to Set a Default Image Shift
One of the most powerful features of the NanoSPECT is its ability to automatically register SPECT and CT data to create anatomically and functionally valuable fused images. Imaging without the application of any transformation typically results in data that are fused well within 1.5mm in any direction. However, taking the time to set up a default image shift can help insure that all image acquisitions are perfectly fused.
Make a simple phantom, but one that breaks symmetry along multiple directions. A syringe with an air bubble, placed in the bed at an angle works well.
Collect an image/CT of the phantom. It is recommended that standard reconstructions (or better) are used for both the image and the CT to enable more precise transformation settings.
-
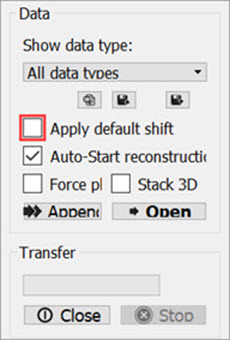
Uncheck the Apply Default Shift box located in the DICOM browser.
Open Data -
Load the data into VivoQuant.
Load Data -
Use the reorientation tool to shift and/or rotate the image data set (Input 1) so that the image and CT data are perfectly aligned. Typically, only shifts are needed for this operation. If rotations are needed, they should be only plus/minus 1 degree. Before clicking Apply, go to Operator > Save As Default and save the transformation
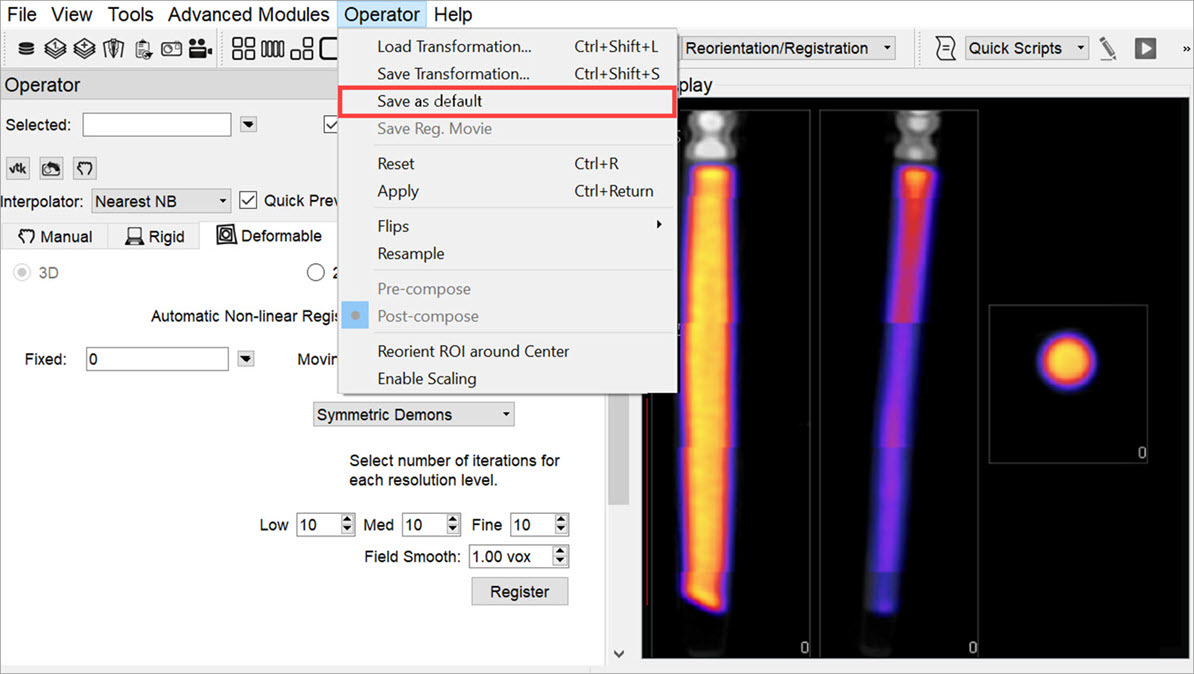
Save as Default -
Return to the Data Browser or go to the Tools Menu and re-check the Apply Default Shift box.
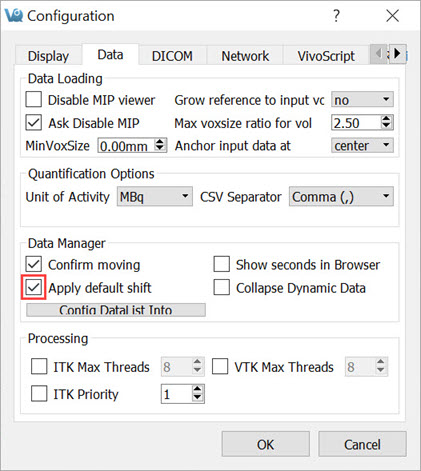
Apply Default Shift

-
Reload the image/CT phantom data that were just acquired. They – and all other data sets – will now be perfectly fused.
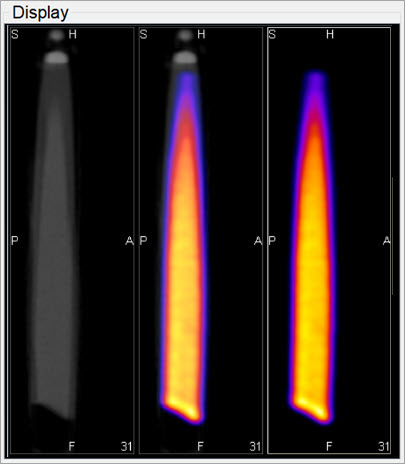
Reload Data